Offgrid Water Filtration–Ceramic Dome Water Filter Review

Happy New Year everyone!!

We hope that 2017 was a great year for you and we hope that 2018 is even better.

Unfortunately, we have had some shifting priorities and this blog fell to the bottom of a long list for the past few months.  For that I apologize and am committed to doing better in this new year.  If you are not following our blog, give us a follow.  We don’t (and will never) spam and we try to provide useful information with regards to things we are doing, some of them work and some of them are truly disastrous, but we have been and will continue to be as completely open and honest as possible.  In full disclosure, we have built relationships with some of the companies that sell the products we use and are Amazon affiliates–so the more links you click and the more things you buy from this blog the more money we will make and the more time we will have for spending time with this.  All this being said, we are not in it to make money–we are in it to share our experiences and let you know what works, and more importantly, what doesn’t work for us.  We will NEVER recommend something we do not have first hand experience with!

Today I want to talk about what we use for water filtration—It’s important to note that all of our water comes from “trusted sources,” our current sources are a city spigot and water catchment.  We aren’t using standing or stagnant water, we also aren’t taking any water out of streams so we don’t have to deal with the potential contaminated water issues that come with those.

We researched many ways, some cheap and some expensive, some intricate and some simple.  I’m a big fan of the KISS method, so I went with the cheap(er) and simpler way.  For us, that was using Ceramic Dome filters and two (food grade) five gallon buckets.  We started with a kit similar to this that included a Dome filter and a spigot.  We used these food grade buckets, now I don’t know what the difference is between food grade and non-food grade but, in my mind, some things just aren’t worth questioning and this was one.

We started with two ceramic filters, I have a link above for the kit that included the spigot and here is one that goes to the individual ceramic filters.

Lesson learned with regards to Ceramic Water Filters: Make sure to  get the ones that have a “pre-filter” or “sock” to cover them–we made the mistake of buying one without the pre-filter and immediately regretted it.  The pre-filter really helps to keep the actual filter clean and helps to lengthen the time in between cleaning the filters.  A quick fix for us when we realized that we really needed that sock was just to use some ground or garden cloth to fashion a sock that fit over it and used rubber bands to hold it on.

We bought two food grade buckets, with lids.  The first step was to install the filters in the bucket.

The Ceramic Filters have a shaft that extends down an inch or two with a nut and washer that you can use to secure it—all we had to do was drill a hole the size of the shaft, we did start with a pilot hole. The hole went through the bottom of what would be the top bucket and through the lid of what would be the bottom bucket.  So now the two filters are locking the top bucket and the lid for the bottom bucket together.

Alternative configurations:  We decided to just use two ceramic dome filters, however with the buckets that we used we could have used anywhere from 1-4 filters.  The more filters you use the faster your water will filter and the more water you can filter before having to replace your filters.  When it is time to replace the filters we have we will go to the four filter configuration.

Once that was done, it was as easy as drilling a hole in the lower section of what would be the bottom bucket and fitting the spigot in.

Spigot tip: We recommend installing the spigot a couple inches (give or take) from the bottom of the bottom bucket.  This will give any debris or sediment that may get in the water a chance to settle to the bottom.

We clean the whole system–just washing the buckets and using a green scrubby on the filters ever month or so—it is readily apparent to us when they need to be cleaned–depending on the amount of water you are filtering and the cleanliness of water you are filtering you may need to clean it more or less.  The filtration rate certainly slows down when the filters get dirty which is an indicator that you need to clean your filters.

In short, this system works great for us.  There are two “what I could’ve done better” lessons for me on this one.  1. I should have just invested in the extra filters and set it up as a 4 filter system. 2. I should have bought a filter that came with a sock or pre-filter for our second ceramic filter.  As soon as it is time to change the two filters out I will be rectifying both of those deficiencies.

Take a look at the slide show we made, let us know your thoughts in the comments–if you have any questions or tips or better ideas, please let us know.  We are always looking for ways to help but are also always looking for better ways.


Who knew the Bug-A-Salt could provide such a profound lesson

Carey and I had to take a trip to town for some groceries, the laundry and to take the dog to the vet (don’t worry, she is fine!). We decided to stay the night and since we did we figured it would be great to go get some dinner. We have stopped at Turtle Mountain Brewery in Rio Rancho a few times, they have a great patio for Radar, great beer and we always get in great conversations with the patio people. Check them out on FB here and while your there make sure you check out Sahaleeoffgrid on FB also!!

Continue reading “Who knew the Bug-A-Salt could provide such a profound lesson”

"Worth the Cash or To the Trash"–AcuRite Weather Center review

As we were wandering around the hardware store last summer we came across this AcuRite Weather Center (model 00615).  We weren’t in the market for a weather station but it was on sale and as we walked the store getting the things we came for we convinced ourselves that we just couldn’t live off-grid without this particular weather station right now… Long story short we were the proud new owners of this piece of technology.

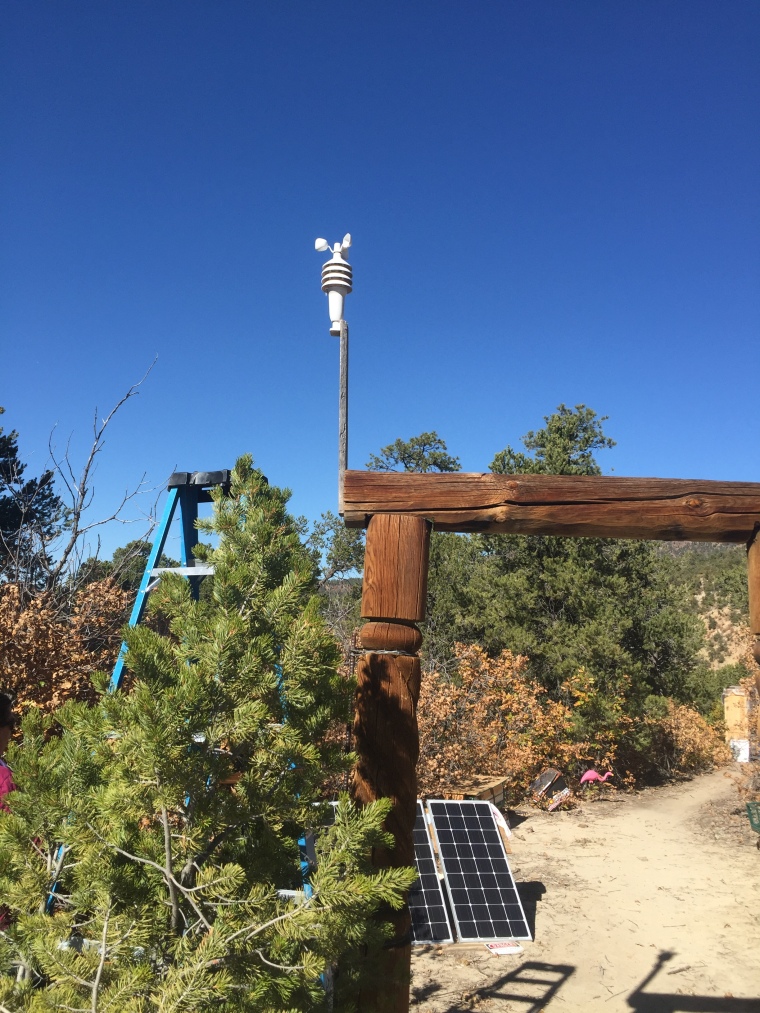
This is a 3 in 1 model, it measures; temperature/humidity (inside and out), wind speed and barometric pressure.  The kit comes with a display unit and the 3 in 1 sensor that is mounted outside in a location of your choice.  The display unit houses loads of good information as seen below and even has trending arrows for outside temp/humidity and pressure as well as a bottom scroller that you can adjust to flash the info that is most important to you.

ARDisplay
Display Unit

The 3 in 1 sensor was very easy to install, and certainly seems like it would be easy to install in numerous locations.  It is really the work horse as it wirelessly transmits all the data to the display unit inside.  The instruction manual says to keep the display unit and sensor within 330 feet of each other and I think we are certainly at that limit and operating fine.

3n1
3 in 1 Sensor


While this a great product overall and we are certainly happy we did make the decision to buy it.  We have identified a few opportunities for improvement…

1. It has a “future forecast” feature in which it “predicts” near term weather using the trending temperatures and barometric pressure.  We are doing better licking our finger and sticking it out the door to create our forecasts than this weather center does.

2. We think it needs a backlight on the Display Unit. It would probably be better if we didn’t know it was 45mph winds at 1:00 in the morning but dangit we still feel we should be able to if we want to.

3. You lose your historical data when you change the batteries in the Display Unit.  Simple solution is to just write it down if you are interested in saving it, wish I would have thought about that before I changed the batteries. 🙂

It’s important to understand that we weren’t shopping for a weather station so we just got one on the spur of the moment… If we had been shopping for one, it’s pretty likely that we could have found one that would have solved problems 2 and 3 at least…These are very minor flaws for us, we definitely feel like we made the right decision on this purchase.  While we may upgrade to a more robust weather station in the future we think this was a great start and was Worth the Cash!


"Worth the Cash or To the Trash" Makita USB Accessory Review

We got very lucky and were gifted two attachments for our power tool batteries that turn them into  multi-port USB Chargers.  We will do a review-of our Makita tools in the near future, but for now I just want to tell you about our experience with this neat little attachment.

Linght 7W USB Powered LED Bulb Sahalee Off Grid

There’s not really much to say, the attachment slides right onto the battery. It has two USB ports so you can charge multiple devices at the same time.  My favorite feature is the dust/dirt cover that seals the USB ports when not in use.  I truly don’t understand why more items of this nature (cell phones, chargers etc..) don’t have this feature as fighting the Sahalee Mud Monster is a constant struggle!!

We have several other USB Chargers, that we will review down the road but this one is our go to source for our evening lighting and charging devices.  Not only are we huge fans of something so simple as a dust cover but the cordless power tool batteries just charge so quick.  This saves us from draining our solar power source or from running the generator, which we hate to do.

What’s that?  You own Dewalt or Milwaukee tools or another brand that is not  Makita?  Don’t fret, Makita is not alone in having this handy attachment just follow this link and search your brand to get one for yourself!!

So, even though it wasn’t our cash– We absolutely believe this attachment is Worth the Cash!

"Worth the Cash or To the Trash"—Danner Boots Review!!

So it’s been about eight months.  Carey and I are starting to settle into our day to day routine and Radar loves doing her hourly perimeter checks.  After this time we are truly starting to get a good feel for how all the items we spent our hard earned dollars on would fare once they got continued heavy use to include making it through most of the winter.  Now it’s time to let the world know, did we make wise purchases on the gear that we would come to depend on or have we whiffed completely.  Maybe a little of both.  Let’s find out, are these items “Worth the Cash or To the Trash”!!

Our first contestant on “Worth the Cash or To the Trash” is my pair of Danner Boots.  I chose to go with the Danner East Ridge 8 inch boot for a few different reasons.

Continue reading “"Worth the Cash or To the Trash"—Danner Boots Review!!”

The check is in the mail

Well we finally did it!! We decided to go with the Super Ger Yurt from Groovy Yurts, it will be delivered in June.  We have an amazing amount of work ahead.  Time to start liquidating the vast majority of our possessions from this materialistic life that we have grown accustomed to, it was great while it lasted but it’s time to get back in touch with our true selves!!  We need to start working on plans for our deck that the Yurt will go on.  Then we need to build the platform that will go under the Yurt on the deck.  Other things that need to be done include getting the plans ready to build an outhouse, find a good stove that we can use to stay warm, figure out how we will have internet connectivity as our workplace is being awesome and giving us the opportunity to work remotely, plus many more things that I am sure will pop up as this transition continues to take shape!!  Feel free to leave your suggestions, thoughts and advice below!!


Introduction

Without visiting in person before making an offer, we discovered the listing for this little gem on the back road to ABQ from Chama.

Criteria met: ≤$1000/acre, Borders National Forest, No HOA or Deed Restrictions.  Well, let’s call the realtor and talk about it.  Really?  That’s all you want for it?  Well, winter is coming and we won’t be able to make it out to visit the property so let’s hold off.  Maybe not, maybe we can mitigate our risk by giving a lower offer.  If he really is ready to sell now he will understand that we aren’t going to pay the full asking price without seeing it.  Success!!  Property purchased, hopefully this doesn’t backfire on us in a bad bad way.

Wow, just wow our expectations are exceeded.  Several miles up an unmaintained  road, bordered on one side by national forest and the property on the other three sides are owned by someone that just comes up for a few days each summer, and he was really a nice guy.  I think this will work, let’s start planning to get the hell out of Florida!!

rd2sahalee

Shopping…

We did a bunch of shopping from Florida and had a few good places picked out in the Chama area that we wanted to look at.  Unfortunately, you just never know what your gonna get from an online ad.  We looked at a few places one piece of property that was pretty flat, had decent irrigation, about 20 acres but it just didn’t suit our fancy.  It was open view all around and there were houses on all sides of the border, so even though it was 20 acres there was no privacy.  We also looked at a  beautiful piece of land that was 5 acres but it was a total cereal bowl—all steep declines leading to a huge open bowl area in the bottom.  Well where do you live in this scenario—either on the side of a steep incline or in a flood zone.  We really wanted to pull the trigger on that piece of property, thankfully we had a close family member there to talk some sense into us, THANKS TERRY!!.  As frustrated as we were that nothing was working out for us, passing on this piece of property was the smartest decision we had made to this point and taught us a valuable lesson.  This is the rest of our lives we are talking about, let’s not be hasty!!  Time to go back to Florida.  Lucky for us we decided to take the back roads back to the airport and just happened to see a bunch of signs for a realtor that we had not talked to yet.

Beautiful view from 5 acres in Chama, but it’s all downhill…

Chama cereal bowl

The Crash

Lehman

http://www.investopedia.com/articles/economics/09/lehman-brothers-collapse.asp

I guess we aren’t going anywhere now. While we weren’t upside down in our house, we felt lucky to have decent jobs, food on the table and we were surrounded by foreclosures.  We may be better off than the majority at this point, but we certainly couldn’t afford to move.  Well, Florida aint so bad let’s hang out a couple years and then head back to the mountains!!


On the hunt…

Time to get serious about finding some property and getting back to the mountains!!  We have both always enjoyed Northern New Mexico and it is certainly cheaper than Colorado.  We identified a few pieces of property that we wanted to look at, but also just wanted to explore the area to see what else we could find.  The goal at this point is to find something at less than $1000/per acre and to be off the grid as much as possible.  One of the pieces of land we wanted to look at was 280 acres just north of Tres Piedras, while it was nice it was certainly just a dream for us as there was no way we could afford that big of a piece of land.  Alright, Florida’s still growing on us.  We don’t want to rush it though and make a bad decision—let’s just stay in Florida, certainly we will find something that fits our requirements before too long!!

On the way to look at the 280 acres on the west side of the gorgegorge